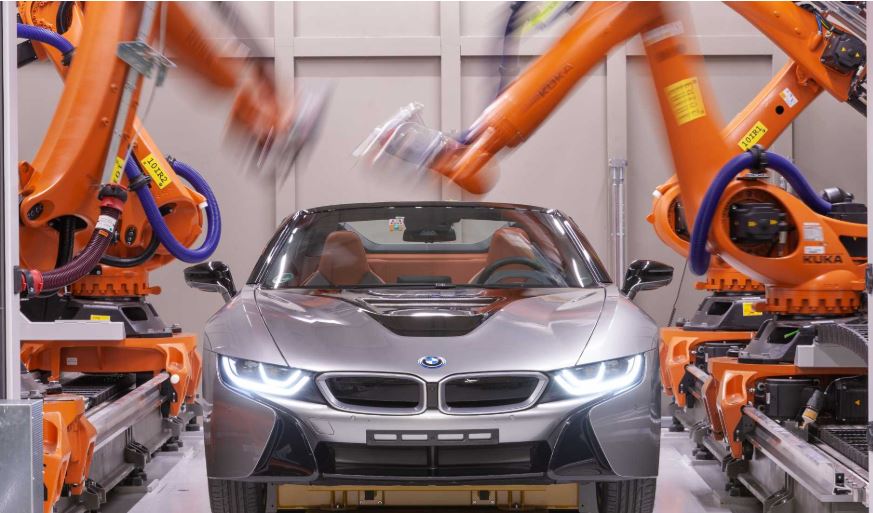
The BMW Group has introduced computer tomography (CT) into prototype development, production and analysis – a first in the automotive industry. Thanks to this technology, the full range of vehicles, from MINI to Rolls-Royce, can now be quality-controlled even in the early stages of development. Scans are performed by four robots which move around the outside of the prototype to produce several thousand cross-sectional images. These are then used for detailed examinations of innovations, new materials and bonding technologies. Until now, vehicles have had to be dismantled for analysis, but CT allows checks to be carried out with the vehicle completely intact. The new X-ray system is based in the BMW Group Pilot Plant in the Research & Innovation Centre (FIZ) in Munich, at the intersection between Development and Production.
Udo Hänle, head of Production Integration and Pilot Plant: “The use of this state-of-the-art computer tomography system is a major step forward for us as it will help us to improve the quality of our products even further. We can now analyse our prototypes in minute detail without having to dismantle them first. The new system allows us to examine our vehicles in a way that wouldn’t be possible with conventional, static computer tomography systems. Ultimately, this will enable us to integrate new technologies into a series vehicles even faster.”
Analysis of internal structures
Michael Koch, head of Material and Process Analysis, adds: “We’ve been using CT and X-ray scans to check vehicle parts for many years, but this latest system takes quality assurance to an entirely new level. We can now analyse our vehicles right down to micro-metre level.”
This degree of detail is required for a range of reasons, for instance to check welds and punch screw connections, and to verify body condition before and after painting, where extreme temperatures can affect adhesive bonds. Findings from the scan are then used as a basis for making targeted modifications to series production.
The scan itself is performed by four coordinated robots. Once the vehicle is in position in the system, the robots move around it. Working in pairs, they send X-rays through it and across to their counterparts. The data they collect is then put through a specially developed computer program that calculates a multi-layered, three-dimensional image. This forms the basis for a detailed analysis of the internal workings of the vehicle, offering information on objects as small as 100 micro-metres – approximately the width of a human hair.
Engineers are currently carrying out research to establish how far Artificial Intelligence might be used to evaluate findings. By processing large amounts of data, the software can learn the many different patterns that occur, link individual items of data, and gradually evaluate findings automatically.
Two years of development work
BMW Group engineers and the Fraunhofer Development Centre for X-Ray Technology (EZRT) spent two years developing the new system, which is the only one of its kind in the automotive industry.
Philipp Janello, project manager at the BMW Group, explains: “Working with X-ray specialists and plant engineers, we were able to enhance the software of the test system with the help of comprehensive test measurements carried out on the vehicle body.” The result is a customised system that meets the requirements of the BMW Group.


